Watch the video to learn four lower back pain home exercises that people commonly do wrong and how to do them correctly. Plus, learn 3 upgraded versions of these exercises that work even better.


Almost there! Please complete this form and click the button below to gain instant access.
Fill Out The Form To Claim YOUR Copy Of “6 Untold Secrets To Overcome Back Pain” (...It’s Currently FREE!)
In this post you'll learn:
- 3 Reasons Why Lower Back Pain Home Exercises May Not Help
- 4 Lower Back Pain Home Exercises That People Commonly Do Wrong
- Lower Back Pain Exercise #1: The Clamshell
- Lower Back Pain Exercise #2: The Bridge
- Lower Back Pain Exercise #3: The Bird Dog
- Lower Back Pain Exercise #4: The Plank
- How Many Sets and Reps Of Each Exercise?
- Review of the 4 Lower Back Pain Exercises
- How to Upgrade Your Lower Back Pain Home Exercises
- Upgraded Exercise #1: Standing Pelvic Tilt
- Upgraded Exercise #2: Standing Clamshell
- Upgraded Exercise #3: Standing Standing Bird Dog
- Conclusion
3 Reasons Why Lower Back Pain Home Exercises May Not Help
I've seen many patients with lower back pain who have had physical therapy before coming to see me, and it hadn't worked for them. One of the first things I'll ask is what they did in their prior physical therapy.
When they tell me their home exercises, often the exercises that they're doing weren't necessarily bad exercises. However, when they show me their exercises, I often see whey they weren't getting better.
Usually when lower back pain home exercises don't work, it's for one of 3 reasons:
- People either don't do them often enough
- They do them with improper technique
- They don't stick with them for long enough to see results
This is usually NOT the patient's fault.
In most physical therapy offices, the physical therapists are treating several patients at the same time. They'll work with one patient white the other patients do their exercises on their own.
Patients are usually left to do their exercises without proper feedback or supervision. If no one ever notices or tells them that they're using improper technique with their exercises, then the patient believes they're doing them right.
So it's no wonder that the exercises don't work.
Furthermore, because patients are often just given a list of home exercises without a great explanation of HOW that exercise will help their lower back pain, and WHY it's important to do it, patients are less likely to do their exercises because they don't seem relevant to their life and their goals.
Because of the first two reasons, not doing exercises often enough and with poor technique, they don't see results.
And because they don't see results, they stop doing them, which is a reasonable thing to do.
If your exercises aren't helping your lower back pain, why continue to do them?
Again, it's usually not the patient's fault.
So why, is this important to know?
Because many people search around the internet watching YouTube videos looking for new exercises for their lower back pain.
And when one exercise doesn't work, it's on to the next, and on to the next, etc.
But when you see the actual exercises in this post, they aren't fancy exercises.
But experts in any industry usually don't do extremely fancy things.
Experts execute the basic well.
You've probably seen, or even done these exercises before.
However, if you've been doing lower back pain exercises and you're still having lower back pain, chances are probably that you 1) didn't do the exercises often enough, 2) did them with improper technique (which we'll fix below), or 3) that you're always looking for new exercises.
Again, not your fault.
It may not be that you need new exercises though, just better execution of some of the exercises that you're already doing.
4 Lower Back Pain Home Exercises That People Commonly Do Wrong
So without further ado, let's get into the four exercises.
The 4 exercises exercises people commonly do wrong are:
- Clamshell
- Bridge
- Bird dog
- Plank
For each of those exercises, I'll explain what the intended effect of the exercise is, the common mistakes that people make, and then how to do the exercise properly.
Lower Back Pain Exercise #1: The Clamshell
The purpose of the clamshell is to stabilize the spine while moving your legs.
Really, that's the purpose of all four of these exercises: core stabilization while you're moving something else.
Now, with the clamshell in particular, its purpose is to stabilize against rotation of your spine.
Your lower back wasn't designed to twist. The facet joints lie inside of one anothe.
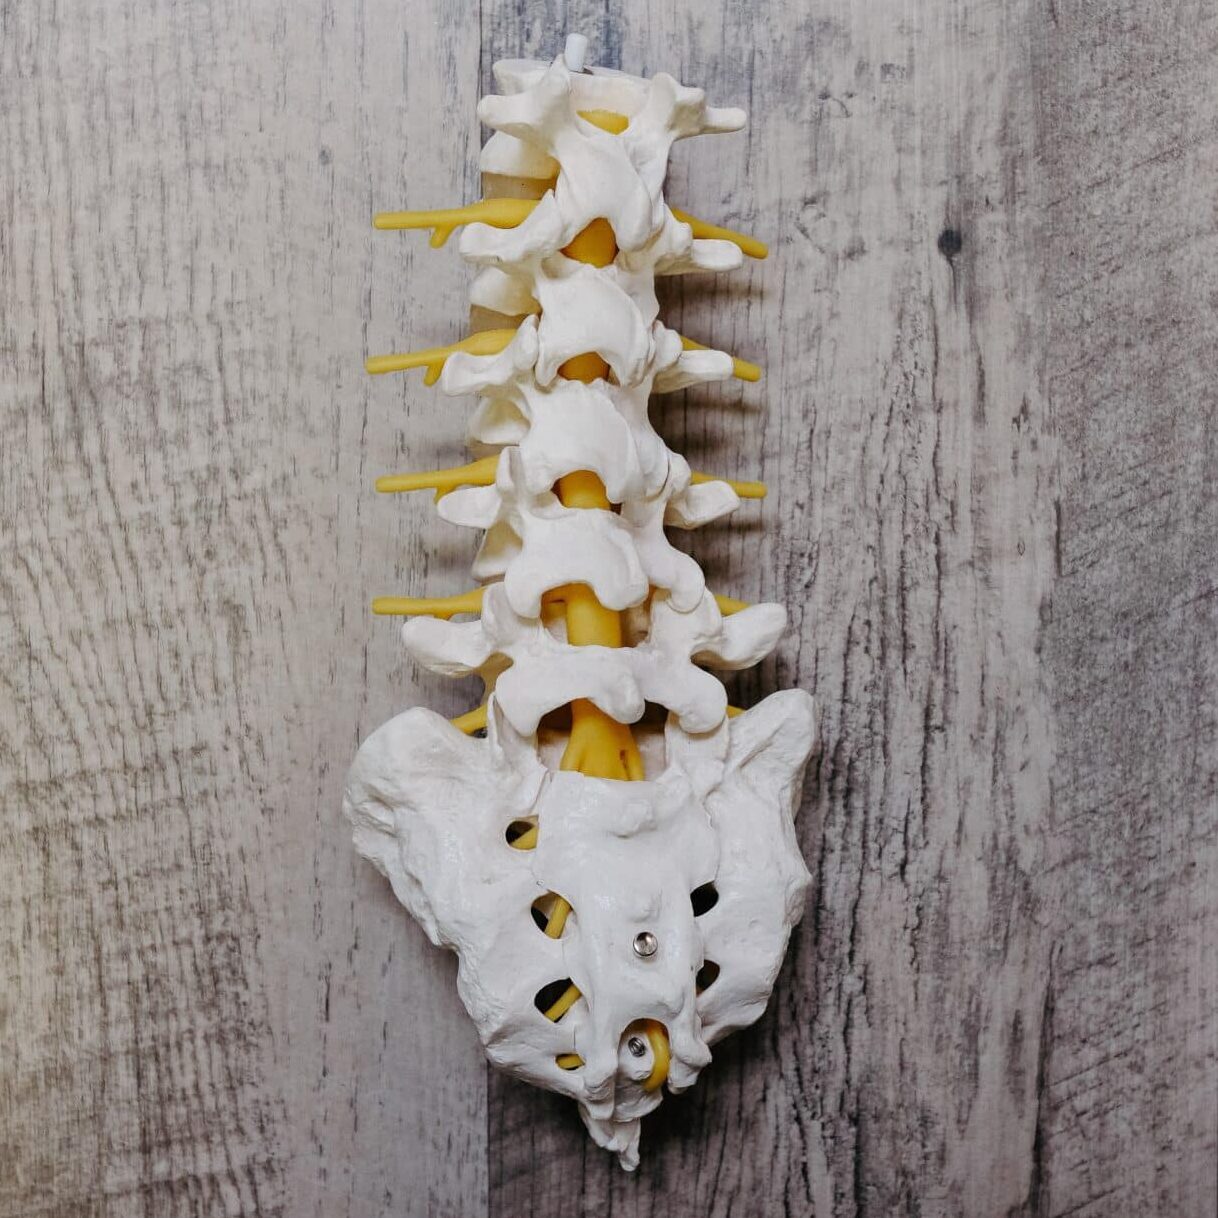
Because of this configuration, there's only a few degrees of rotation at each level. If you twist further than that, then you start shearing on the discs in your lower back. That which can set you up for injury.
Common mistake with the clamshell exercise
A common mistake that people make when doing the clamshell exercise is they allow too much rotation in their trunk.
How to do the clamshell exercise properly
To do the clamshell exercise properly, you'll lay down on your side and roll forwards a little more than you think you would have to.
What that does is it activates the back part of your gluteal muscles and your hip external rotator muscles.
It also doesn't allow you to use your tensor fasciae latae, a hip muscle commonly associated with IT band pain.
Take your hand, put your thumb on the front of your pelvic bone. Make sure that you don't feel any movement in that bone. If you feel that bone move backwards, it tells you that your pelvis is rotating.
With your four fingers, put them on your butt, and you should feel your gluteal muscles contract.
When you do the clamshell exercise correctly, you can see it's a fairly tiny movement.
It's very rare in everyday life that we need large amounts of hip opening. So it's not necessarily important that you get a large range of motion. It's more important that you stabilize your core, and that you activate your glutes.
Read more about the clamshell exercise.
Lower Back Pain Exercise #2: The Bridge
Now the second exercise is the bridge, and the purpose of the bridge is likewise core stabilization.
With the clamshell, you're stabilizing while doing hip rotation. However, with the bridge, you're stabilizing your core while doing hip extension, which means moving your thigh backwards.
Common mistake with the bridge exercise
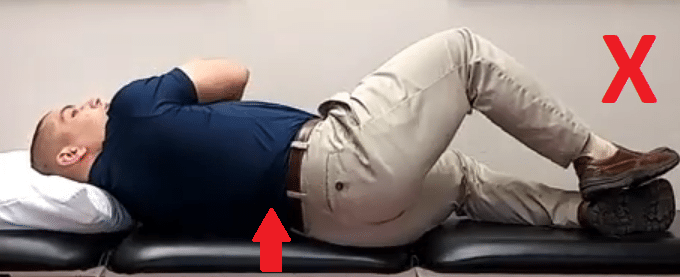
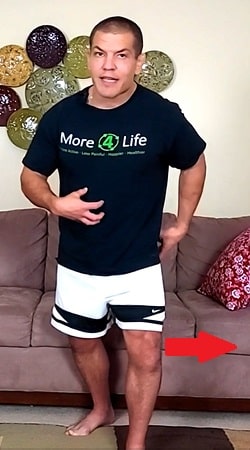
Here's how people commonly do the bridge.
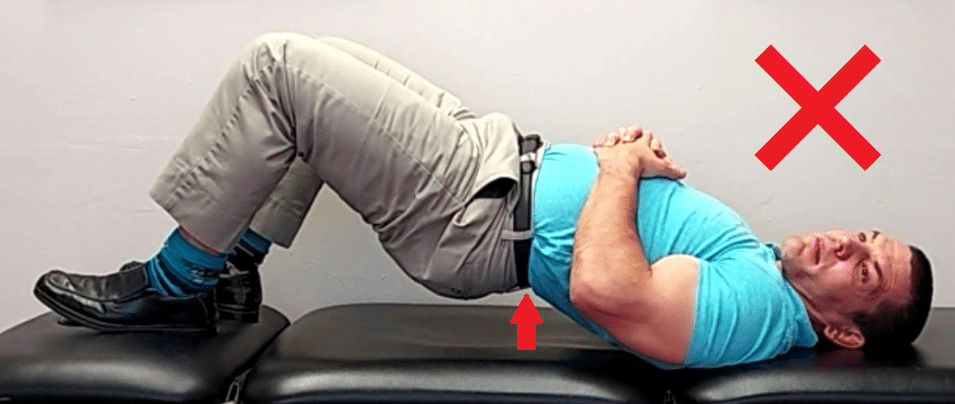
They bridge up really high, which causes their lower back to arch backward.
Backward bending jams the facet joints in your lower back together.
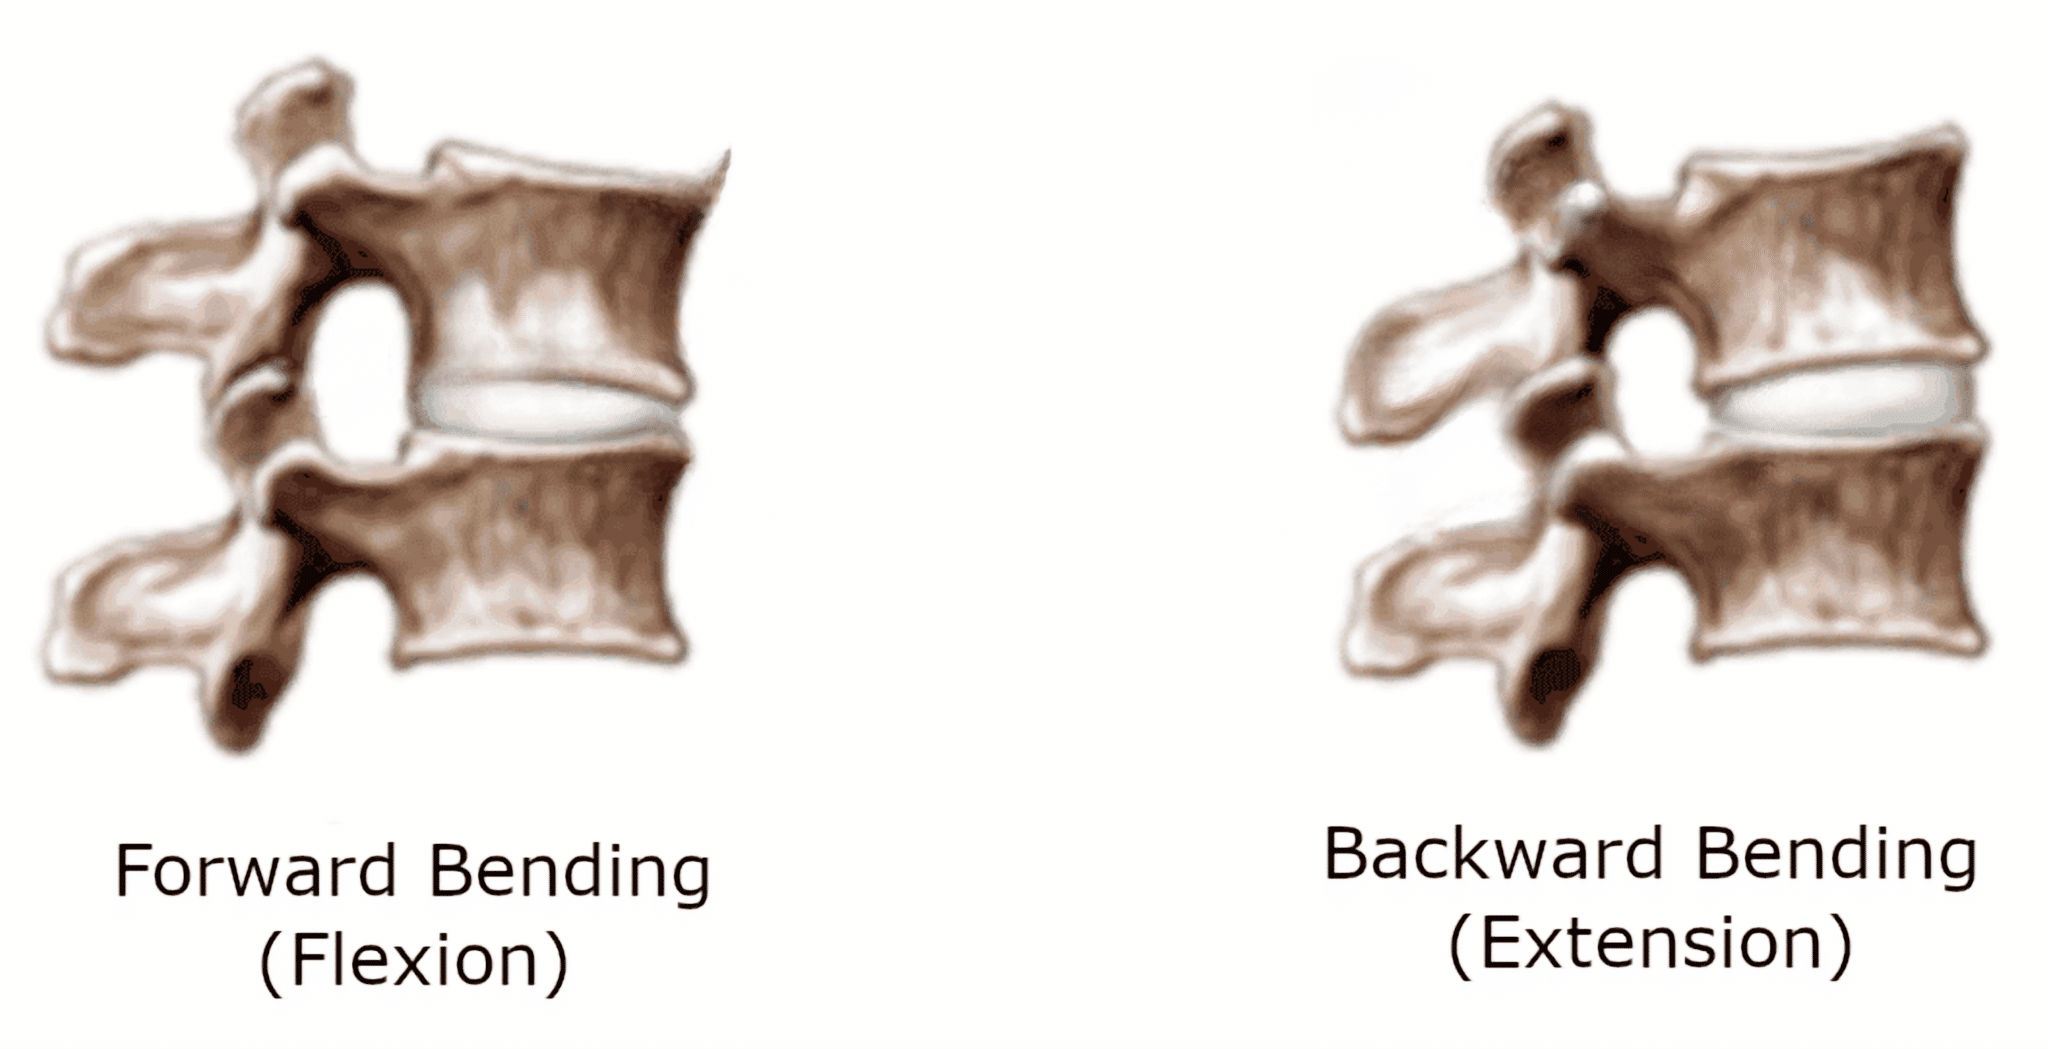
Furthermore, it narrows the openings where the nerve roots come out of your lower back.
That can actually create lower back pain, particularly in people who are sensitive to lower back extension.
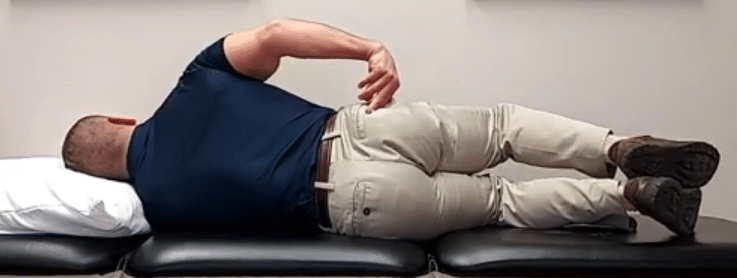
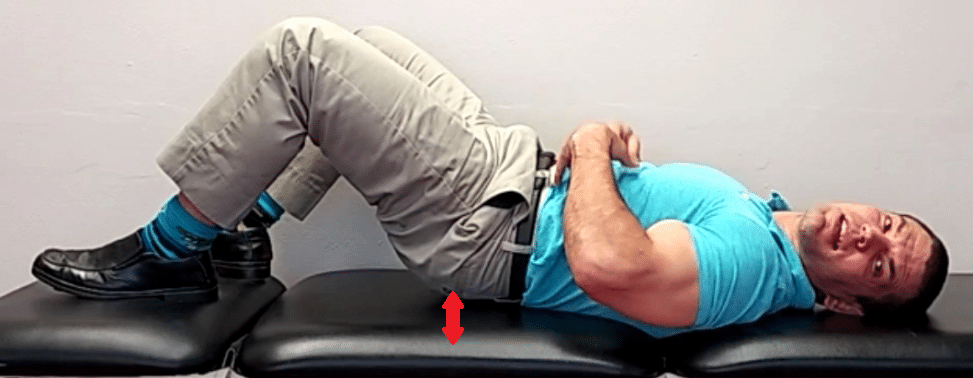
How to do the bridge properly
To do the bridge properly, you want to start out by doing a pelvic tilt, where you pull your belly in and try and flatten your lower back out so that there's no space between your lower back and the ground.

Try and get your lower back flat on the ground.
If you can't even do a pelvic tilt, this is probably the place to start.
Once you can do a pelvic tilt, then the next step is to go into a bridge.
It's important to maintain the pelvic tilt.
Keep your lower back flat while pushing your heels into the ground and squeezing your glutes, so that you lift your pelvis up.
Again, the key to this is that you can't lose the pelvic tilt.
If you start arching your lower back, you've lost the pelvic tilt.
Much like the clamshell, doing this exercise properly probably means that you're going to move much less than you may be used to doing.
And that's OK.
So again to do the bridge correctly:
- Do a pelvic tilt to flatten your lower back into the ground.
- Push the heels into the ground to activate your glutes.
- Roll your pelvis up off the ground, lifting your butt up without losing the pelvic tilt.
Lower Back Pain Exercise #3: The Bird Dog
The third exercise is the bird dog.
This exercise meant to control both extension and rotation at the same time.
If you're not familiar with what the bird dog is, it's named because it kind of looks like a hunting dog pointing to a bird
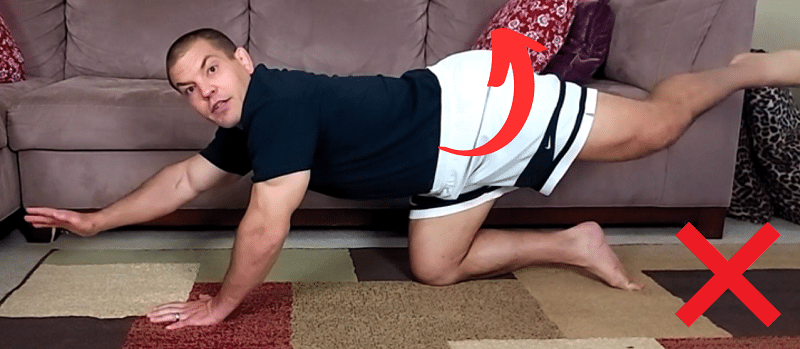
Common mistakes with the bird dog exercise
One mistake that people commonly make is that they either allow too much extension (arch) in their lower back.
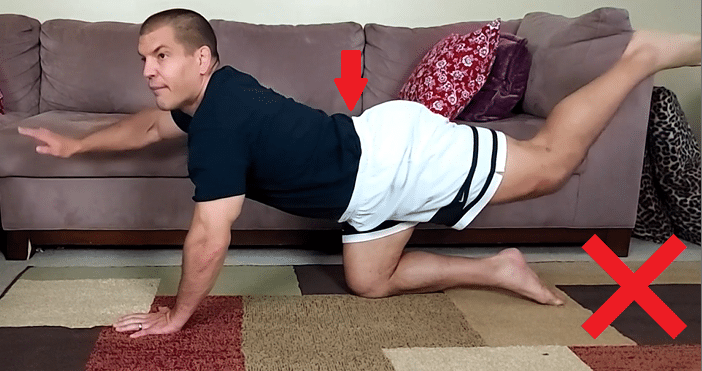
Another mistake is that they allow their spine to twist.
How to do the bird dog exercise correctly
And so to do this correctly, you want to make sure that you first kind of stabilize your trunk.
Start out by doing a cat-cow exercise. Arch your spine all the way up, then all the way down, and then find a midrange position.
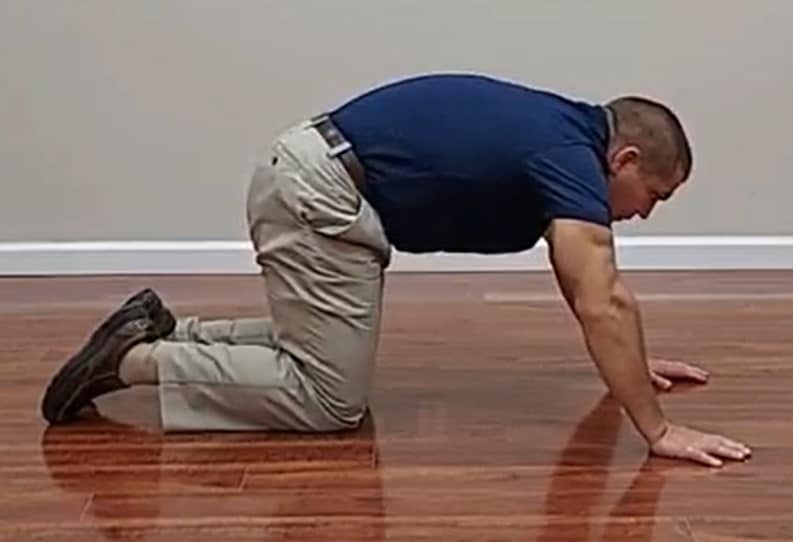
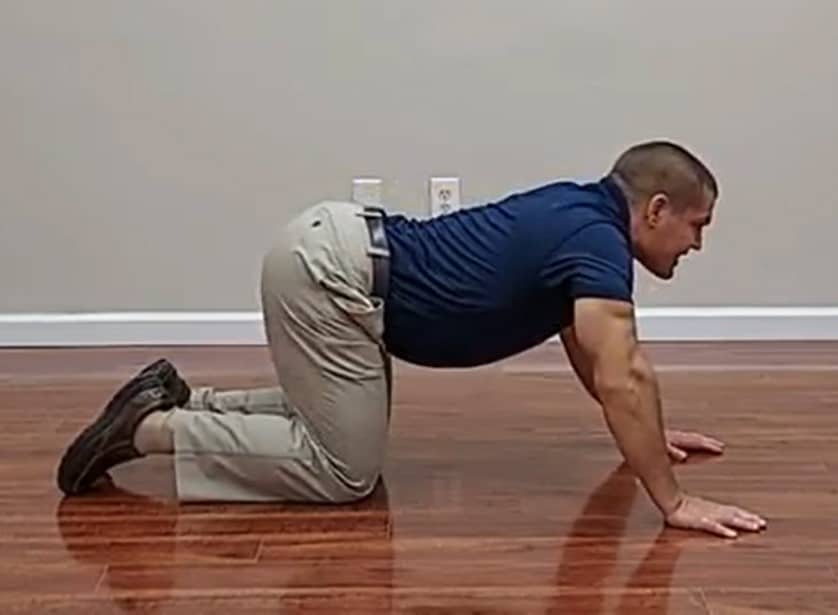
Try to maintain that position through the rest of the exercise.
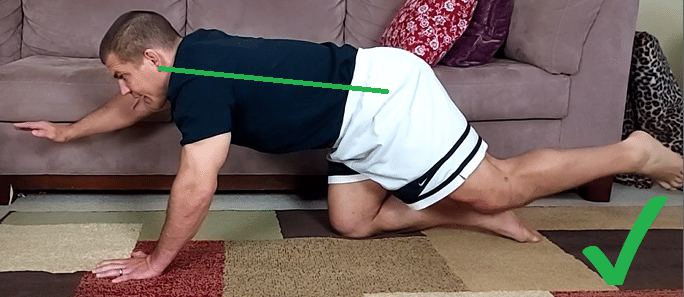
Then slide your leg out behind you and make sure that you don't get too much extension or rotation.
If you can get your leg out behind you without extending or rotating, then raise the opposite arm.
If you can't control your spine position with raising your leg, you may need to start with just leg lifts until you can control your spine position.
Note that just like the previous two exercises, controlling your spine properly may limit how far you can move your arm and leg.
And again, that's OK.
It's better to do a few good repetitions than a whole bunch of bad repetitions.
Lower Back Pain Exercise #4: The Plank
The fourth exercise is the plank.
The plank is so-named because you ideally want to make your body straight like a plank from shoulder to ankle.
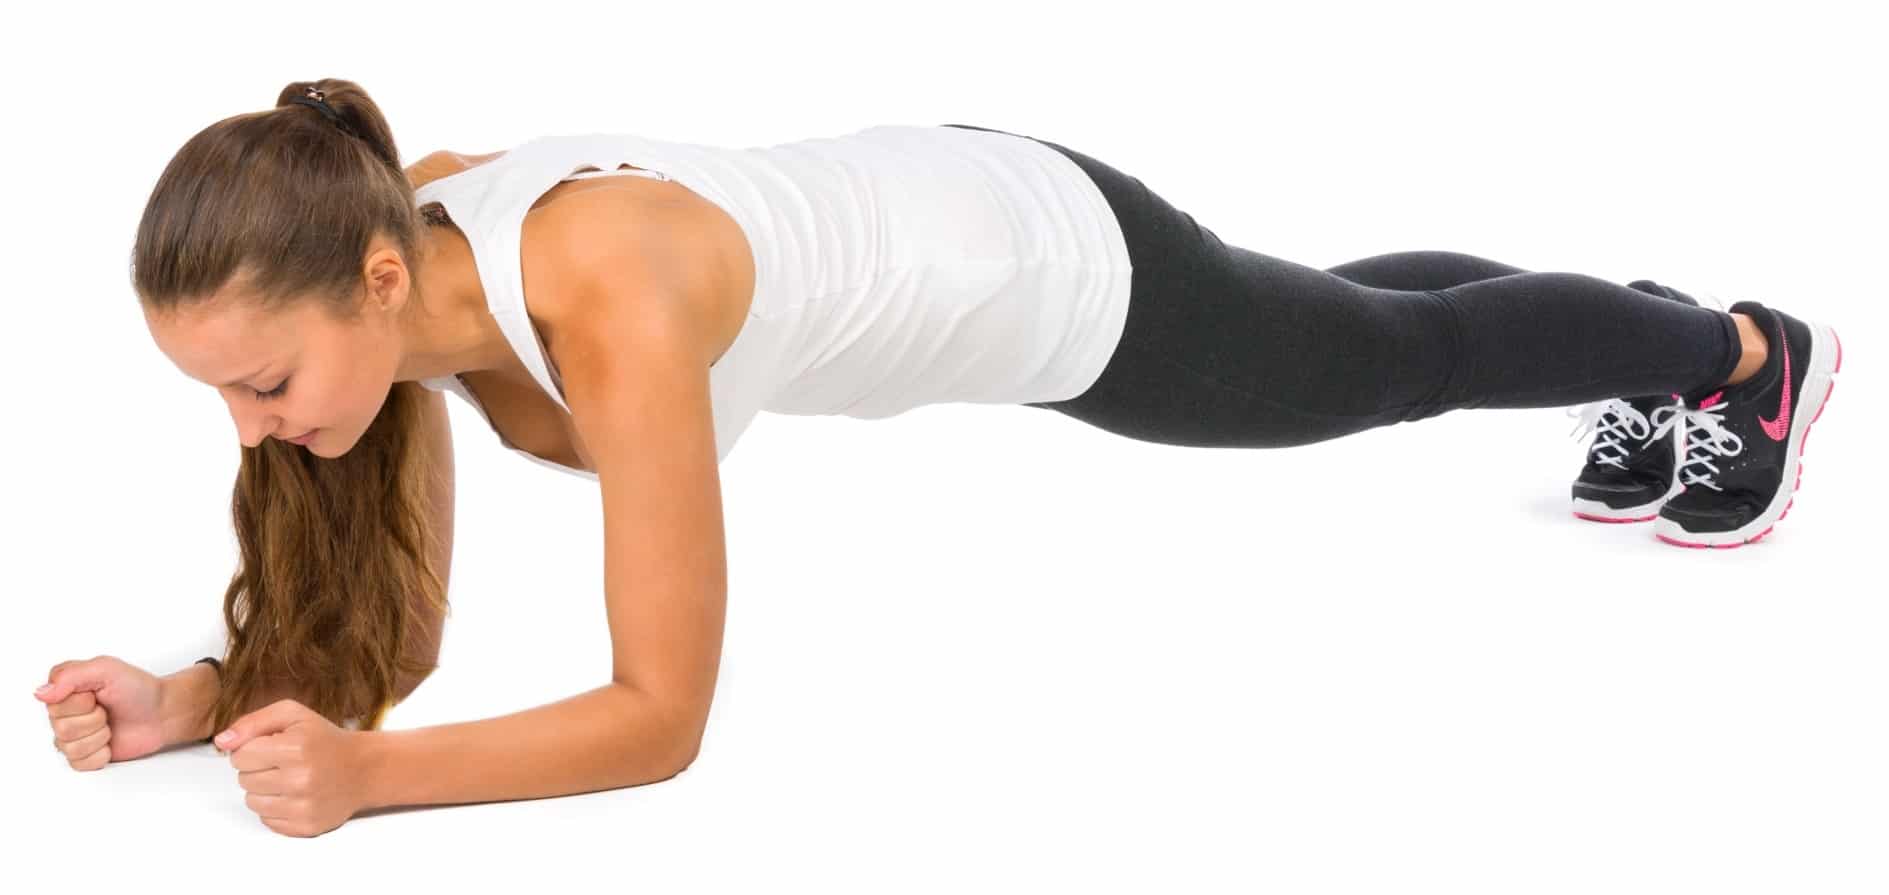
In reality, that rarely happens.
Common mistake with the plank exercise
The mistake that most people make is to allow their lower back to sag into extension.
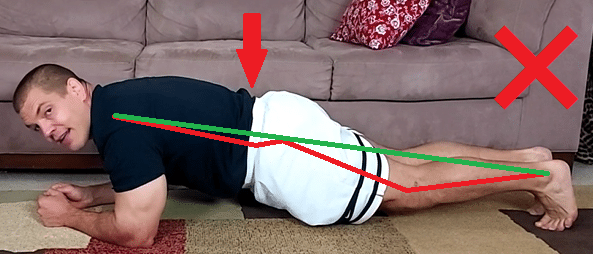
That creates an arch in your lower back. It also means you're not utilizing your abdominal muscles.
How to do the plank exercise correctly
The proper way to do the plank to contract your abdominal muscles as well as your gluteal muscles at the same time so that you're keeping your body straight.
To do that, it helps actually to raise your butt up in the air and tighten your abdominals.
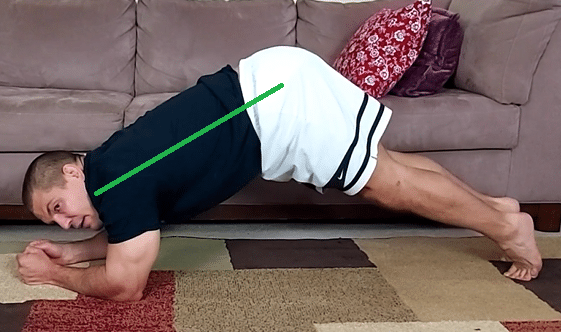
Then hold that abdominal contraction, while squeezing your glutes to push your pelvis down toward the floor.
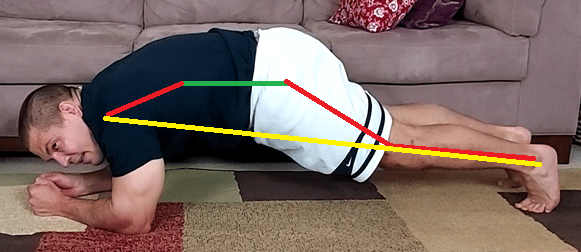
Here, you'll see that I'm not completely in a straight line.
And that's OK.
The yellow line would be the "ideal" plank. However, if you've got tight hip flexors, then you're not going to be able to get into that straight line position without arching your lower back.
And it's MORE important to have your lower back in a neutral position with your abdominals and glutes activated that it is to be in a straight line from ankle to shoulder.
How Many Sets and Reps Of Each Exercise?
Now you may be wondering, "Well, how many sets or repetitions should I do of these exercises?"
The truth is, it doesn't matter.
It's going to change for each person.
You want to do as many repetitions as you can with good technique, no more and no less.
There's no standard one set of ten or three sets of ten that's perfect for every single person.
It's actually more important that you do your exercises often, meaning do them regularly.
Do them every day at least once a day if you're having lower back pain.
Really, what most lower back pain home exercises do is to retrain your brain to produce new movement patterns.
So, it's more important that you stimulate and utilize those movement patterns on a regular basis, than necessarily if you do 10 repetitions or 12 repetitions or two sets of 10 repetitions.
Just do the exercises often enough that your brain learns those new movement patterns.
Review of the 4 Lower Back Pain Exercises
To review, those four exercises were:
- Clamshell
- Bridge
- Bird dog
- Plank
One thing you might notice about all four of those exercises is that they're all done laying on the ground.
There are a few problems with that.
In fact, I rarely give patients any of those exercises anymore.
They're great exercises for lower back pain, but as I mentioned earlier, one of the reasons why exercises don't commonly work is people don't do them often enough.
If you have to get down on the ground or if you have to lie down to do your exercises, then you're less likely to do them.
Chances are, if you're a busy person, then you may only get a chance to do them first thing in the morning or in the evening before you go to bed.
Furthermore, if you have back pain and you have trouble getting down on the ground, then it's likely that you're probably not going to do them as often as if you had exercises that you could do either sitting or standing up.
For those reasons, I usually try to give patients exercises where they don't have to get down on the ground.
That way they can do the exercises throughout the course of the day whenever they have a moment.
If you're at work, you'd look kind of silly getting down on the ground to do your exercises. Chances are though, if there's something you could do standing or sitting down, you could do it multiple times per day without having to set aside a lot of extra time to do your exercises.
And that helps overcome the problem of not doing exercises often enough.
How To Upgrade Your Lower Back Pain Home Exercises
What are some standing alternatives to the four lower back pain exercises mentioned above?
Here are a few ways to take those exercises and turn them into functional movement patterns that you can perform throughout the day without having to get down on the ground.
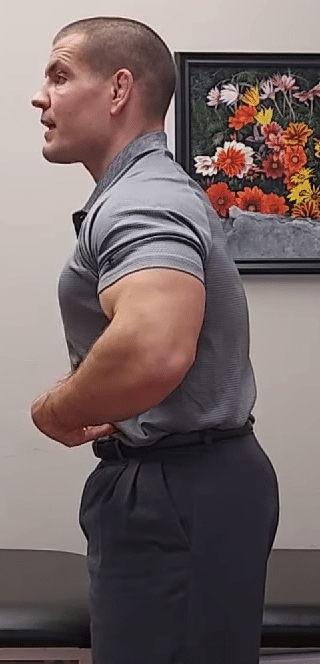
Upgraded Exercise #1: Standing Pelvic Tilt
For the first exercise, we're going to actually combine two the exercises: the bridge and the plank.
If you think about what you're doing during those two exercises, you're activating your abdominals as well as your glutes and trying to get your spine in more of a neutral position.
To do that in a standing position, you tighten your abdominal muscles, roll your pelvis slightly underneath you. It may help to bend your knees a little.
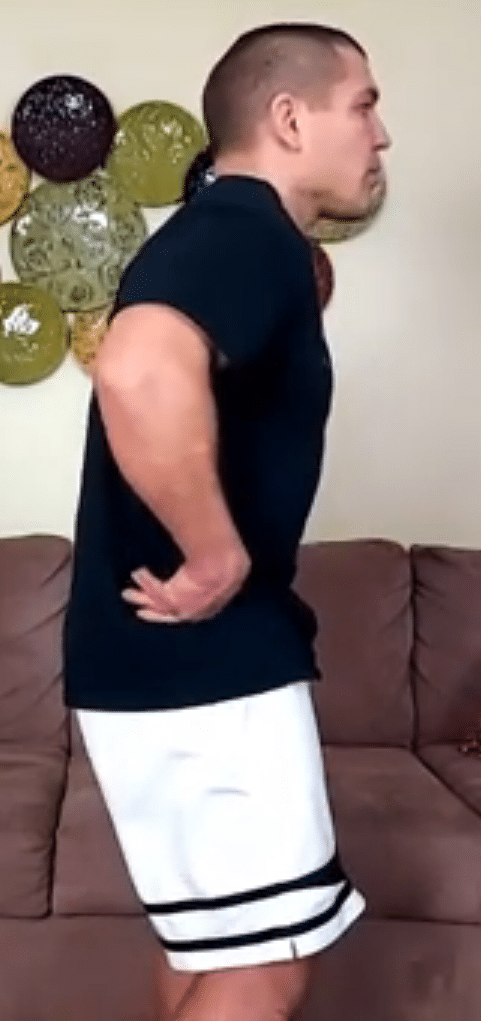
Then squeeze your glutes and straighten your knees back out without losing the pelvis tilt.
Sounds kind of like the bridge, right?
Hold that position as often as you can throughout the day.
If you're really squeezing your glutes and abdominals hard, you're going to tire out quickly.
You won't be able to hold that level of intensity all day long.
However, even if you can just do 20 percent, that's going to put your spine in a more functional position.
That way your facet joints aren't jamming together, and you're not narrowing the spaces where the nerves to your legs exit your spine.
d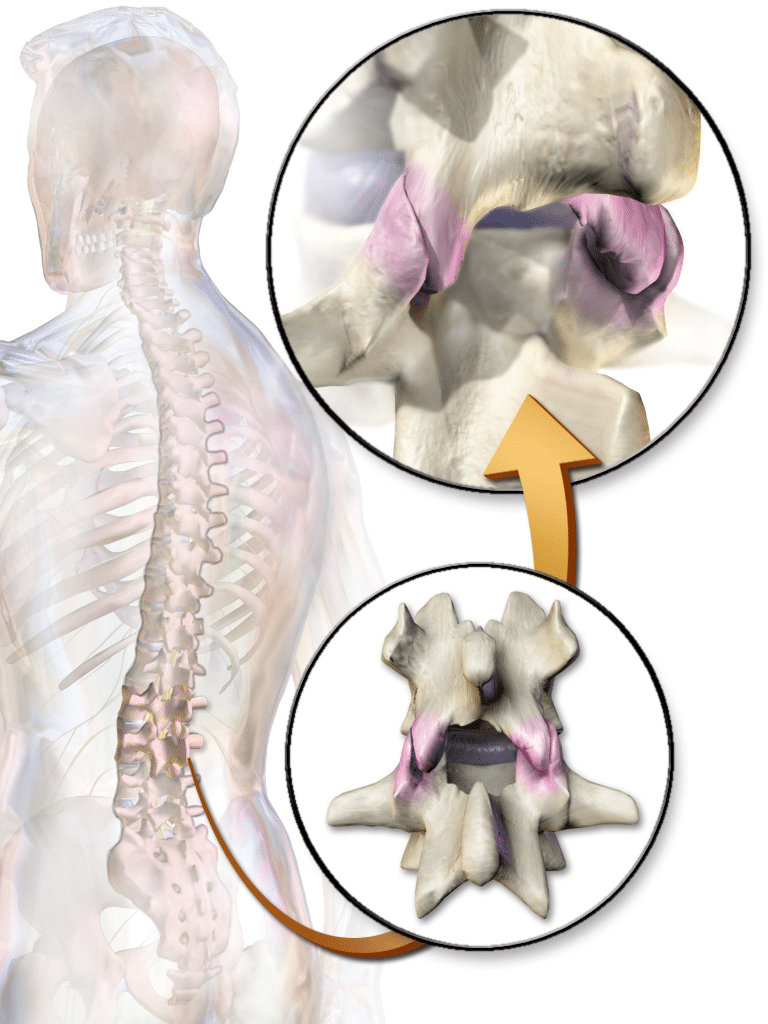
That will help you be able to stand more comfortably throughout the day.
It's more important to be able to maintain a good spinal position throughout the day and have your muscles work longer than to do really intense exercises to get them stronger.
For most activities that we do during the day, we don't need all of our strength.
It's actually really only a small percentage of it. But we need to do it all day long. And so, developing the endurance of those muscles to tighten your core, tighten your glutes, will help you be able to stand longer throughout the course of your day.
That's particularly if you get lower back pain from standing or if your lower back pain gets worse towards the end of the day.
Now what about the clamshell and the bird dog exercises?
Upgraded Exercise #2: Standing Clamshell
When you put weight on one leg, if your knee caves inwards, it causes your hip to go into internal rotation, which and it can also cause pelvic rotation.
That in turn can causes twisting in your lower back.
As mentioned above, your lower back wasn't designed to twist.
So, in order to prevent twisting, you want to be able to keep your hip and pelvis neutral as you go to take a step.
To practice doing that take a step with one leg.
Then tighten your abdominals and turn your knee out by squeezing your glutes. When you do this your weight will shift more toward the outer side of your foot.
So, this exercise is just like doing a standing clamshell.
The more weight you put on your front foot, the more difficult the exercise becomes.
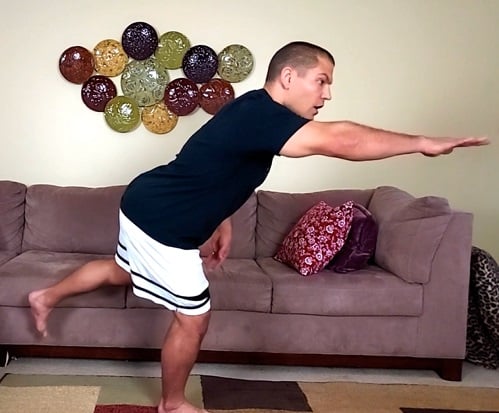
Upgraded Exercise #3: Standing Standing Bird Dog
That actually where the bird dog part of this exercise comes in.
As you shift more and more weight onto your front foot as if taking a step, eventually you'll load 100% of your weight on that foot and the other one will leave the ground.
And that's like the first step of the bid dog exercise.

If you really want to do a standing bird dog, then you can raise the other arm in front of you as well.
Conclusion
So those are three standing upgrades that help you to take those four lower back pain home exercises and turn them into more functional activities.
Hopefully the information in this post will help you be able to perform your lower back pain exercises correctly as well as more often so that you actually get results from them.
Need More Help For Lower Back Pain?
If you live in the St. Louis area need more help for your lower back pain, we'd be happy to help you at More for Life. Just tap the button below to request an appointment with one of our specialist physical therapists.
Like this post? Here are some other posts about lower back pain exercises you might enjoy:
The 7 Best Core Strengthening Exercises For Lower Back Pain
8 Stretches For Lower Back Pain and Hip Mobility
Chair Yoga Seniors Can Do For Neck Pain & Back Pain In 7 Easy Poses